Document Your Project
Contents
Document Your Project
What is a Documentation ?
A documentation is the major part of a published project that tells users about the functionality provided by your project. In scientific community, the importance of documentation is usually underestimated, partly because the hurry of science people and the lack of target users. But this is not the reason for skipping this vital part - a clear documentation is the first step to increase the popularity of your project.
A documentation usually consists of the following parts.
A brief introduction to the project. Its name, logo, motivation, target users, main features, advantages over other competitors. As a reliable developer, it is also necessary to hint the drawbacks/caveats of your project.
A quick start guide, including how to download the resources, install the software, setup the run-time environment, how to quickly begin a “hello world” example, and where to go for the next step.
A tutorial which introduce the main components of your project. Step by step guides should be provided to users.
A detailed reference. List every detail of the project that you want to provide to the users. For a library, list every (sub-)modules, classes, function and variables, and carefully describe them.
Other project-related information. The license, the list of contributors, how to seek for help, how to raise issues.
Many good examples of documentations are written by various developers. We explore some of them in the following.
Nlohmann JSON
Nlohmann JSON is a modern C++ library for parsing/dumping JSON data streams. It is particularly useful for loading configure files at the entrance of a program. We will give a more complete introduction to the JSON libraries in the Python Programming and C++ programming chapters. We will also introduce the JavaScript programming in the GUI Development chapter. But let us focus on its documentation organization in this section.
Nlohmann JSON library is hosted on Github, and provides its documentation in a single Markdown page, suitable for such a single-usage library. The main components of the documentation are:
The design goals, i.e., the brief introduction.
The integration, i.e., how to install the library.
The examples, i.e., quick start and tutorials.
The full API details are provided in another website.
Other related information.
Therefore, it is fully compliant to the required parts we have introduced.
NumPy
NumPy is the fundamental package for scientific computation in Python. It provides basic array/matrix operations, linear algebras, statistical operations and random number generators, etc. NumPy will be introduced in the Python Programming/Scientific Computation section, here we focus on its documentation organization.
NumPy is a large library, so its documentation should be hosted on a separate website. It has several versions, from old, stable to those for developers. Each of those version has a separate entrance of documentation, but they all share the same structure:
Why is NumPy states the its design goal and target users.
Absolute beginner’s guide tells the installation and the most simple usage. Install and Quick start are organized in distinct part because its wide target.
Tutorials and How tos and fundamentals introduce its main components.
The API reference is so long, so it is provided through a separate page. NumPy is written in C so its full C-API is also provided.
Despite of complex of NumPy, its documentation still follows the common structures with all required parts.
The IllustrisTNG Project
Overview of of Documentation-Writting Tools
Documentation can be written by any human-readable text format. The most common formats are
Txt: plain text format, usually with file name suffix
.txt. It is supported on almost any operating system and almost any text editor. Some raw catalogs in astronomy provide documentation with txt format, mainly due to the historical reason, simplicity requirement and stability requirement. Examples include the galaxy group catalogs of Yang X.-H. et al.Markdown: a simple, linear-layout markup language, usually with suffix
.md. Markdown is designed as a simplified version of HTML language - only the most important features, like heading, paragraph, hyperlink, image, list, table, etc., are preserved. Github uses it as the default (and only available) documentation format.ReStructuredText (ReST) and Sphinx: a full featured documentation format, usually with suffix
.restor.rst, particularly suitable for writting documentation for codes. It is a superset of Markdown, and a subset of HTML. This project, AstroHammmer, is written in ReST and organized by Sphinx.HyperText Markup Language (HTML): a full featured language, capable for any documentation. A HTML file is usually suffixed with
.html. It is a dragon-killing technique, very complicated, but able to control every aspect (every character or even every pixel) of your documentation. Every modern website uses HTML pages to describe its structure.Word and LaTeX: forget them - they are not the correct documentation formats.
Plain text is so simple that we cannot tell much about it in AstroHammmer. HTML is overcomplicated so that half of a individual chapter, GUI Development, is provided to introduce it. In the following of this section, we introduce how to use Markdown and ReST/Sphinx.
Some programming languages provide library tools to generate documentations from inline comments of source files. This indeed helps to generate the API reference, but helps little for other parts of a full documentation, i.e., the basic techniques in this section are still mandatory for documentation. We will explore the language-specific documentation tools in the corresponding chapters.
Using Markdown
Editing and Building
Markdown is a simple markup language for linearly layout documentations. It can be written in any text editor. There are many ways to render it as an styled output.
Online editors: For example, Dillinger allows editing Markdown file and see the preview immediately. It also allows generating HTML of PDF output so that you can preview the documentation in Browser or PDF reader.
Code hubs: Simply create a Github repository, create Mardown files in it, and edit them online.
Local editors: For example, VSCode users may install git extension “Markdown All in One”, and press “Ctrl+Shift+V” to preview.
Parsers in Programming Languages: For example, in Python, use Python-Markdown, you make read all content from a Markdown file, convert it to a HTML string and save it. You may then preview the output by Browser. In JavaScript, use showdownjs to parse a Markdown string to a HTML string and render it in the DOM tree.
Note that different building systems may provide different extensions to the minimal set of basic Markdown language. For example, math formula cannot be rendered on Github but can be rendered in some of the other online editors. Be cautious to the actual standard of the target site that hosts your documentation.
Syntax
Markdown has very simple syntax. This includes block markups like headings, paragraphs, lists, code blocks and tablies, and inline markups like emphasis, hyperlinks, images, and inline codes. Below we list the standard part of Markdown syntax. The extension part can be found in the Further Readings section.
Headings
# This is level-1 Heading
## This is level-2 Heading
...
###### Up to level-6 Heading
Rendered output depends on the rendering system:
This is level-1 Heading
This is level-2 Heading
...
Up to level-6 Heading
Paragraphs
Simply type sentences for a paragraph. A paragraph may span
multiple lines.

Use a blank line to separate two paragraphs.
Rendered output:
Simply type sentences for a paragraph. A paragraph may span multiple lines.
Use a blank line to separate two Paragraphs.
Emphasis
This text will be *Italic*. This text will also be _Italic_.

This text will be **Bold**. This text will also be __Bold__.
Rendered output:
This text will be Italic. This text will also be Italic.
This text will be Bold. This text will also be Bold.
Lists
Lists can be created with a asterisks *, dashes - or
plus signs + in front of lines, and can be nested with indentations.
* Item 1a
* Item 1b
  - Nested Item 2a
  - Nested Item 2b
    + Deeper Nested Item 3a
    + Deeper Nested Item 3c
Rendered output:
Item 1a
Item 1b
Nested Item 2a
Nested Item 2b
Deeper Nested Item 3a
Deeper Nested Item 3c
Oreder lists can be created with numbers followed periods, and can be nested. The numbers do not have to be in any numerical order.
1. Item 1
2. Item 2
3. Item 3
   1. Nested Item 1
   2. Nested Item 2
   3. Nested Item 3
Rendered output:
Item 1
Item 2
Item 3
Nested Item 1
Nested Item 2
Nested Item 3
Hyperlinks
Texts with hyperlinks can be create by a special grammer [content text](url).
The content text is the text that readers see, and url is either a absolute
url or a absolute or relative path in the file system (if hosted on Github).
Your [GitHub](http://github.com/) repositories.
Rendered output:
Your Github repositories.
Images
Images can be denoted by .
The alt text usually cannot be seen - it is displayed only if
the image cannot be rendered for some reason.

Rendered output:

Codes
Code samples can be either inline or block. For block code, you may specify a language for highlighting (e.g., python, cpp, text).
This is an inline code sample: `d = {'a': 1, 'b': 2}`, and this is a code block:
```python
def add(a, b):
    return a+b
```
Rendered output:
This is an inline code sample: d = {'a': 1, 'b': 2}, and this is a code block:
def add(a, b):
  return a+b
Tables
Tables are created by list of words, with hyphens, -, and pipes, |
separating rows and columns. Alignment can be specified by colons at left, right or both sides of
the hyphens below the header row.
Planet | Star | Galaxy
---:|:---:|---
Earth| Sun | Milky Way - the Galaxy
Jupyter | Alpha Centauri | M31 - Andromeda
Rendere output:
Planet |
Star |
Galaxy |
|---|---|---|
Earth |
Sun |
Milky Way - the Galaxy |
Jupyter |
Alpha Centauri |
M31 - Andromeda |
Further Readings
Many resources about Markdown writting can be found online. We list some of them.
The github guides Mastring Markdown.
Markdown cheat sheet - a quick reference to the Markdown syntax.
Using Sphinx
Sphinx is a documentation generation system written in Python. It was originally developed for Python documentation, but later extended to document anything.
Sphinx does not specify anything about the document format - it is a framework to organize and generate docs. It parse the source files written in other markup languages (Markdown, ReST, etc.), collect them into a single documentation tree, and generate the readable documentations in various formats (HTML, PDF, etc.). Users can view the documentations by Internet browsers or PDF readers. There are also websites that can host the documentation for you.
The most widely used markup language for Sphinx documentation is ReStructuredText (ReST) language, which is an extension of Markdown and a subset of HTML. It include many useful features to organize multiple documentation files, specify targets and cross-ref them, and style the codes.
Start Your Sphinx Documentation
Installation
First, with a Python environment, install Sphinx by running:
$ pip install sphinx
If you use conda to manage the python environment, it is better to install sphinx with conda:
$ conda install sphinx
Refer to the Sphinx Doc/Install Sphinx for other ways of installation.
Choose a Theme
Many projects have used Sphinx to generate documentations. They developed sphinx themes with different styles. See the theme gallery for a review.
In this introduction we use sphinx-rtd-theme. It is the official
theme designed by Read the Docs, widely used
in many projects. Install it by running:
$ pip install sphinx-rtd-theme
For a detailed description about how to configure the theme, see Read the Docs Sphinx Theme.
Start Your Doc
Choose a path in your operating system, make a new directory, enter it, and running sphinx-quickstart to
initialize a new documentation system. For example:
$ mkdir get-started-with-sphinx && cd get-started-with-sphinx
$ sphinx-quickstart
Some question will be asked. For “Separate source and build directories”, answer “n”; for project name, type your project name, like “get-started-with-sphinx”; for “author names”, type a name or a list of names, like “Albert Einstein, Edwin Hubble”; for “project release”, type your version number, like “0.0.1.alpha”; for “project language”, choose “en”.
After this, a near-empty documentation system is initialized, with the current directory as the root directory (i.e., all absolute paths in doc files start from here). Some files and folders are created:
get-started-with-sphinx
  |- _build/        # rendered output files are written here
  |- _static/       # static content, like style sheet files and scripts
  |- _templates/    # template HTML files
  |- conf.py        # documentation configurations
  |- index.rst      # the home page of the doc, i.e., root of the doc tree
  |- make.bat       # shell script for rendering
  |- Makefile       # shell script for rendering
We will see the usages of these files/folders later.
Configure and Build
The configuration file conf.py specifies how sphinx renders your
documentation. In this tutorial, we add this import line at its beginning:
# conf.py
import sphinx_rtd_theme
to import the theme we have chosen. We change the extensions = [...]
and html_theme settings as:
# conf.py
extensions = [ "sphinx_rtd_theme" ]
html_theme = "sphinx_rtd_theme"
html_theme_options = {
    "navigation_depth": -1
}
to enable the extension, set the theme, and control the theme options for navigator style.
To build the documentation as HTML format for the readers, run:
$ make html

Now, the output files are put into _build/html folder.
Open the file index.html with your Internet browser to see the rendered
documentation, as shown in the Figure.
Because currently we only have one doc file index.rst in the documentation root,
the rendered output has only one page, with some index pages automatically generated
by Sphinx. We will introduce how to organize and write documentation files in the remaining
of this section. Each time you change any file, run $ make html again to
override the output.
After changing a theme or adding customized style sheet, you may have to clean
the cache of building by running $ make clean and clear the cache of browser
to see the new effect.
Basic Syntax
A ReST document usually suffixed with .rst. Let us start with the
root document index.rst.
We begin with the Markdown-like syntax which describes block elements like headings, paragraphs, lists, code blocks and tables, and inline elements like emphasis, hyperlinks, images, inline codes. We then move to deeper topics about ReST.
Sphinx itself has a well organized tutorial for ReST - the reStructuredText Primer.
Headings, Paragraphs and Emphasis
Headings are created by underlining (and optionally, overlining) the heading texts with punctuation character, at least as long as the text:
===================
The heading
===================

Also a Heading
++++++++++++++++++

Lower-level Heading
----------------------
Allowed characters include #, *, =, -, ^,
and ". No specific meanings are assigned to each of these character. The levels
of headings are determined by the order they appear.
The extra effects of headings depend on the theme. Some themes put items in the main navigator for headings, while some put in the side navigator, and some allow controlling the nested depth that can be displayed. Refer to the manuals of the themes for details.
Rendered output:
The Heading
Also a Heading
Lower-level Heading
As in Markdown, paragraphs are barely sentences. Two paragraphs are separated by
at least one blank line. Use two asterisks ** to mark bold emphasis
and use one for italic:
Simply type sentences for a paragraph. **A paragraph** may span
multiple lines.

Use a blank line to separate *two paragraphs*.
Rendered output:
Simply type sentences for a paragraph. A paragraph may span multiple lines.
Use a blank line to separate two paragraphs.
Lists
Unordered lists are created by putting an asterisks * in front of
each of the list items. Nested lites are made by proper indentation with any
number of spaces, but a blank line is necessary to separate them:
* Item 1a
* Item 1b

  * Nested Item 2a
  * Nested Item 2b

    * Deeper Nested Item 3a
    * Deeper Nested Item 3c
Rendered output:
Item 1a
Item 1b
Nested Item 2a
Nested Item 2b
Deeper Nested Item 3a
Deeper Nested Item 3c
Ordered lists are created by prefixing each item with a number and a dot, or a # and a dot:
1. Item 1
2. Item 2
3. Item 3

  1. Nested Item 1
  2. Nested Item 2
  3. Nested Item 3
Rendered output:
Item 1
Item 2
Item 3
Nested Item 1
Nested Item 2
Nested Item 3
Hyperlinks
ReST provide different types of hyperlinks for specific tasks. An Internet URL can be referred to by `content text <url>`_, with at least one space before “<”.
Your `GitHub <http://github.com/>`_ repositories.
Rendered output:
Your GitHub repositories.
Foot notes can be created by .. [#name] note, and referred to by [#name]_.
Or use [1], [2], etc, to explicitly number them:
Refer to the footnote [#mynote]_ and another foot note [#anothernote]_.
Or explicitly number the footnote by [4]_.

.. [#mynote] the note text put here.
.. [#anothernote] another note text.
.. [4] explicitly numbered.
Refer to the footnote 1 and another foot note 2. Or explicitly number the footnote by 4.
References can be define by .. [name] reference detail, and referred to by
[name]_. The definitions of references can be accessed over the
entire document tree:
For an overview of Galaxy Formation & Evolution, see the book [GFE]_ for detail.

.. [GFE] Galaxy Formation and Evolution, Book by Frank Van den Bosch, Houjun Mo, and Simon White, 2010, Cambridge, London.
Rendered output:
For an overview of Galaxy Formation & Evolution, see the book [GFE] for detail.
- GFE
Galaxy Formation and Evolution, Book by Frank Van den Bosch, Houjun Mo, and Simon White, 2010, Cambridge, London.
To create a target in your document, use .. _target-name:. Then refer
to the target by the ref role:
.. _the-galaxy-introduction:

A galaxy is a complex system consists of billions of stars, a large amount of gas,
and surrounding invisible dark matter.

By clicking :ref:`here <the-galaxy-introduction>`, the reader jumps to the target.
Rendered output:
A galaxy is a complex system consists of billions of stars, a large amount of gas, and surrounding invisible dark matter.
By clicking here, the reader jumps to the target.
Images
Images can be denoted by the image directive, with additional
arguments specifying its detail rendering behavior:
.. image:: img/document/python.svg
  :width: 350px
The figure directive, on the other hand, allows a caption:
.. figure:: img/document/python.svg
  :figwidth: 350px

  A caption can be put here to describe the figure.
Rendered output:
Fig. 1 A caption can be put here to describe the figure.
Codes
Inline code sample can be created by ``code content``. A block of code can be created
with the code-block directive, with an optional language specification:
To define a function in Python, use the ``def`` keyword, followed by
the function name and a list of arguments enclosed by a pair of parentheses, like:

.. code-block:: py

  def sum(a, b):
      return a+b
Rendered output:
To define a function in Python, use the def keyword, followed by
the function name and a list of arguments enclosed by a pair of parentheses, like:
def sum(a, b):
    return a+b
Tables
Tables can be created by using multiple = to separate the
header and the body. Columns are defined by breaking continuous =:
=================== =================== ========================
Planet              Star                Galaxy
=================== =================== ========================
Earth               Sun                 Milky Way - the Galaxy
Jupyter             Alpha Centauri      M31 - Andromeda
=================== =================== ========================
Rendered output:
Planet |
Star |
Galaxy |
|---|---|---|
Earth |
Sun |
Milky Way - the Galaxy |
Jupyter |
Alpha Centauri |
M31 - Andromeda |
More detailed options can be specific by using the table directive
to enclose the table:
.. table:: Table caption is put here.
  :width: 100%
  :align: center

  =================== =================== ========================
  Planet              Star                Galaxy
  =================== =================== ========================
  Earth               Sun                 Milky Way - the Galaxy
  Jupyter             Alpha Centauri      M31 - Andromeda
  =================== =================== ========================
Rendered output:
Planet |
Star |
Galaxy |
|---|---|---|
Earth |
Sun |
Milky Way - the Galaxy |
Jupyter |
Alpha Centauri |
M31 - Andromeda |
Note that the detail rendering depends on the theme you choose. The options may not have any effect.
TOC Tree
ReST is designed for larger scale documentations than Markdown. With ReST, you can even write a book with many chapter and sub-chapters.
A large documentation usually contains a set of documents, organized
hierarchically to form a trees structure. In ReST, you can use toctree
directive to organize your documents.
The toctree directive is used in a parent document, with a list
pointint to sub-documents. The rendered output will show a list of hyperlinks
to those sub-documents. If you choose a good theme, this structure
is also displayed in the side-bar.
Note that TOC trees can be nested. You can put a TOC tree in a sub-document pointing to a list of sub-sub-documents.
In the example “get-started-with-sphinx” we have built, create another rst document “chapter1.rst”. Also create a new folder named “chapter2”, and put three files named “index.rst”, “section2.1.rst” and “section2.2.rst” in it.
The file system of your project is like
get-started-with-sphinx
  |- conf.py        # documentation configurations
  |- index.rst      # the home page of the doc, i.e., root of the doc tree
  |- chapter1.rst
  |- chapter2/
    |- index.rst
    |- section2.1.rst
    |- section2.2.rst
  ...
Link the chapter files in your root “index.rst” by:
Welcome to get-started-with-sphinx's documentation!
===================================================

.. toctree::
  :maxdepth: 2
  :caption: Contents:

  chapter1
  chapter2/index
Put arbitrary contents into the rst documents. For example, the file “chapter1.rst” is:
***************************************
Chapter 1: An Introduction to Astronomy
***************************************

Contents are put here ...
The file “chapter2/index.rst” has links to the section files:
***************************************
Chapter 2: Astronomical Instruments
***************************************

.. toctree::

    section2.1
    section2.2
The file “section2.1.rst” is
Section 2.1 The Hubble Space Telescope (HST)
++++++++++++++++++++++++++++++++++++++++++++++

Contents are put here ...
The file “section2.2.rst” is
Section 2.2 The Subaru Telescope
++++++++++++++++++++++++++++++++++++++++++++++

Contents are put here ...
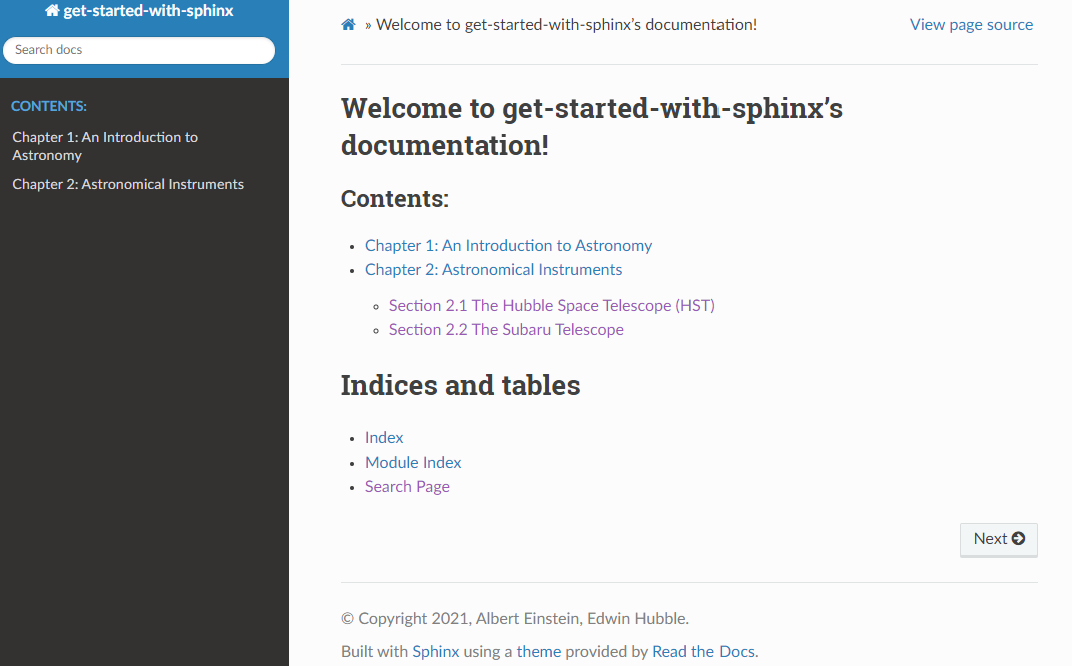
Finally, re-rendering your project by running $ make html in the
project root directory, and open the _build/html/index.html again.
Now you see the documents are organized as a tree structure.
Document Your Python Library
An obvious advantage of ReST is that it can be used to generate documentation for your library API written in common programming language. For example, you can document a Python function anywhere, and cross-ref it in other locations in this project.
To document a Python function, use the py:function directive, and
cross-ref it by the py:func role:
.. py:function:: bar(a, b=1)

  The description text for bar can be put here.

  :params a: the first parameter.
  :params int b: the second parameter.
  :return: None.

You may refer to the function by :py:func:`bar`.
Rendered output:
- bar(a, b=1)
The description text for bar can be put here.
- Params a
the first parameter.
- Params int b
the second parameter.
- Returns
None.
You may refer to the function by bar().
A global variable can be described by the py:data directive,
and cross-referred by the py:data role:
 .. py:data:: foo
   :value: 1
   :type: int

   An description for the variable is put here.

You can refer to the variable anywhere by :py:data:`foo`.
Rendered output:
- foo: int = 1
An description for the variable is put here.
You can refer to the variable anywhere by foo.
A class is described by the py:class directive, and cross-referred
by the py:class role. Its method is defined by py:method
and cross-referred by the py:mesh role. Its attribute is defined
by py:attribute and cross-referred by the py:attr role:
.. py:class:: Galaxy(mass=1.0, size=2.0, name='Milky Way')

  A galaxy in the HST catalog.

  :params mass: stellar mass in :math:`M_\odot`.
  :params size: effective radius in :math:`{\rm kpc}`.

  .. py:attribute:: mass
    :type: float

  .. py:attribute:: size
  .. py:attribute:: name

  .. py:method:: set_mass(mass=1.0)

    Change the stellar mass of the galaxy.

    :params mass: the stellar mass to reset.
    :return: None.

You can refer to the class by :py:class:`Galaxy`, and its method by
:py:meth:`Galaxy.set_mass`, and its attribute by :py:attr:`Galaxy.mass`.
Rendered output:
- class Galaxy(mass=1.0, size=2.0, name='Milky Way')
A galaxy in the HST catalog.
- Params mass
stellar mass in \(M_\odot\).
- Params size
effective radius in \({\rm kpc}\).
- mass: float
- size
- name
- set_mass(mass=1.0)
Change the stellar mass of the galaxy.
- Params mass
the stellar mass to reset.
- Returns
None.
You can refer to the class by Galaxy, and its method by
Galaxy.set_mass(), and its attribute by Galaxy.mass.
A Python module can be described by first defining the module environment
with py:module directive and then defining other functions, class,
variables as usual:
.. py:module:: lig

.. function:: library_info()

  Print the library version, such as "0.0.1.alpha".

The definition in a module can be referred by its full name :py:func:`lig.library_info`.
Rendered output:
- lig.library_info()
Print the library version, such as “0.0.1.alpha”.
The definition in a module can be referred by its full name lig.library_info().
Document Your C++ Library
TBD.
Futher Readings
The sphinx official site gives nice syntax documentation of ReST.
ReST tutorial: sphinx-doc.org/usage/rest.
Using Sphinx: sphinx-doc.org/usage/sphinx.
Your Sphinx documentation can be hosted on Github, and rendered in Read the Docs so that people can read it online.
Read the Docs site: https://readthedocs.org/.
Other Topics in the Future
Some topics are not decided yet. If you prefer any of them in the list or not in the list, please tell us:
Latex (optional)
HTML (optional)
Automated tools for generating docs (introduced in programming language sections).